
Property Section & Tabs
Keyboard shortcut: Ctrl + Alt + P
The Property section is where:
- Settings and attributes of a property, including area measures, are assigned
- Parameters that will be used in the calculation of a property’s value are defined
- Snapshots for a single property are generated
- Property data is imported and exported
- Every change made to a property's data is logged
Article contents:
Property Settings
Ctrl + Alt displays the numeric keyboard shortcut.
The Property Settings tab is where:
- Basic property data such as code, name and address are entered
- Property analysis date, report begin date, analysis term, default inflation effective month and default ADR inflation rate are managed
Properties inherit the settings and preferences that exist at the Folder level when a Property is created. If Folder level settings and preferences change, child Properties are notified of the change, but do not automatically inherit the changes. A Property can override inherited settings and preferences.
Property Settings Tab Tools Menu
Property Underwriting Workbook
Property Underwriting Workbooks are currently not supported for hospitality property types and will be added at a future date.
Property Settings Fields
Code is a required property identification code with a 20 character maximum (commas and asterisks are not accepted). Each property code within the same folder must be unique.
Property Type is an informational field only that identifies whether the property is Commercial, Multifamily or Hospitality. The Property Type is determined when a new property is added and cannot be changed.
Name - Address 1 & 2 - City - State - ZIP are used to enter the full property name and address.
Analysis Begin is the start date of entries and computations (i.e., the date on which the cash flow projection begins). This date controls input assumptions based on a 12 month period. This is a required field that defaults to the first day of the current month and year when the property is added.
Tip: It is recommended to always start with January (i.e., 1/1 of any year). The Report Begin date may be different if you wish to commence reporting during a different month or year.
Term is the length of the analysis commencing on the Analysis Begin date and reflects the maximum number of years for which cash flows will be calculated and may be reported on (default is 10, Min 1, Max 35).
Report Begin is the default start date of the reporting period based on a 12 month period. The date entered must be >= to the Analysis Begin date.
Note: Analysis Begin and Report Begin are always assumed to occur on the first day of the month. Data entry is in the MM/YYYY format.
Note: Analysis Begin, Report Begin, and Term can also be set in the Folder section on the Property List tab.
Market Effective Month represents the default month on which each named Inflation item is effective. The effective month may be changed to be something different than the Market Effective Month on the Inflation tab within the Hospitality section.
Valuation Settings
Ctrl + Alt displays the numeric keyboard shortcut.
The Valuation Settings tab is used to:
- Define the parameters that will be used in the calculation of a property’s value for up to five (5) scenarios simultaneously.
- If more than one (1) valuation scenario exists, define which of the scenarios will be the “default” scenario.
- Display the calculated valuation amount and amount/area for each valuation scenario.
Valuation Settings - Scenario Definition
# of Valuation Scenarios defines the number of scenarios for which unique valuation parameters may be entered and property valuations calculated. Any number of scenarios between one (1) and five (5) may be selected, with a default of one (1).
When the # of Valuation Scenarios is increased, the initial settings for the new scenarios will match the settings for highest existing scenario number. For example, if the # of Valuation Scenarios is initially set to “2” and then subsequently changed to “4”, the initial settings for Scenario #3 and Scenario #4 will match the settings of Scenario #2 (these settings may subsequently be edited by the user).
Default Scenario # reflects which of the available scenarios numbers will be the “default” scenario. The default scenario:
- Defines the valuation parameters that will be utilized when a Property Underwriting Workbook is generated from the Header Menu.

- Defines the valuation scenario that will appear as the default selection in the “Scenario” drop-down list when a Property Underwriting Workbook is generated from the Property Settings tab in the Property section.
Note: Although the default scenario will initially appear as the selection in the “Scenario” drop-down list, the user may change this selection to any other valuation scenario.
Warning: If the Default Scenario # has a Valuation Type = "Direct Cap", then the user will be unable to generate an Underwriting Workbook. Direct Cap valuations do not contemplate greater than one year subsequent to the Valuation Date, which is incompatible with the requirements for generation of an Underwriting Workbook.
- Defines the valuation scenario that will be the default selection for the Valuation report generated from the Reports menu.
Note: Although the default scenario will initially appear as the default selection for the Valuation report, the user may change this selection to any combination of available valuation scenarios.
- Defines the valuation scenario that will be used for the Prop 13 tax calculation, if Prop 13 is being used to calculate real estate tax expense for the property.
Warning: If the Default Scenario # is no longer available because the user reduces the # of Valuation Scenarios (i.e., Scenario #4 is initially selected as the Default Scenario and the user than changes the # of Valuation Scenarios to “3”), then the Default Scenario # will automatically revert back to Scenario #1.
Valuation Settings Fields
The following fields are available for each Valuation Scenario:
Scenario Description represents a descriptive name for the Valuation Scenario (i.e., “As-Is”, “As-Built”, “As-Stabilized”).
Valuation Type determines the method that will be used to calculate the property valuation. Subsequent data entry fields will be enabled/disabled based upon the Valuation Type selected. Available selections include:
- "DCF" (i.e., Discounted Cash Flow): Value will be determined by discounting future cash flows back to a specified date utilizing a user input discount rate. Included in future cash flows is a reversion value that is calculated by applying a user-defined capitalization rate to a future net operating income.
- "Direct Cap": Value will be determined by applying a direct capitalization rate (otherwise known as a "going-in" cap rate) to net operating income for the initial year after the valuation date.
- "Specified Price": User enters a specific value, which is typically an agreed-upon purchase price.
Helpful Hint: Unlike "Direct Cap", whereby inputs only allow for the calculation of a direct capitalization value and no Underwriting Workbook is available, "Specified Price" also allows for inputs necessary to calculate a reversion value. This allows for an Underwriting Workbook to be generated that can calculate an IRR and/or leveraged returns based upon the specified price, defined hold period, debt assumptions (if any) and reversion value.
Valuation Date Type defines the date of valuation (i.e., time period “0” for IRR calculation purposes).
Available selections include:
- “Analysis Begin Date” as defined on the Property Settings tab in the Property section.
- “Report Begin Date” as defined on the Property Settings tab in the Property section.
- “Specified Date”, whereby a date may be entered in the Valuation Date field.
Valuation Date is a user-defined date of valuation when “Specified Date” is selected as the Valuation Date Type (see above). The date entered must be subsequent to the Analysis Begin Date.
Note: The Valuation Date is always assumed to occur on the first day of the month. Data is entered in the MM/YYYY format.
Note: If the Valuation Date Type is set to either “Analysis Begin Date” or “Report Begin Date”, the Valuation Date field is non-editable and displays “N/A”.
Specified Price ("Specified Price" valuation only) defines the user defined value, which is typically an agreed-upon purchase price.
Going-In Capitalization Rate ("Direct Cap" valuation only) (also known as the direct capitalization rate) is the capitalization rate that is applied to year one Net Operating Income after the defined valuation date.
Valuation Term (Years) ("DCF" & "Specified Price" valuations only) defines the holding period (in years) for which (i) property cash flows will be discounted in the calculation of the property’s value ("DCF" valuation); or (ii) an IRR will be calculated ("Specified Price" valuation).
Note: The Valuation Term must be at least three years, when considered in conjunction with the Valuation Date, must be supported by the Analysis Begin Date and Term (“analysis term”) as entered on the Property Settings tab in the Property section. Stated differently, there must be enough analysis term to support the valuation date and hold period. If the analysis term is insufficient, the Valuation Term field will default to the maximum number of years as supported by the analysis term.
Discount Rate ("DCF" valuation only) defines the rate of return used to determine the present value of future property cash flows.
Discount Rate Increment ("DCF" valuation only) defines the percentage increment that will be added to/subtracted from the Discount Rate for purposes of the Valuation Matrix on the Valuation Report. Two increments above and two increments below the Discount Rate will be displayed on the matrix in accordance with this increment.
For example, a 10.00% Discount Rate with a 0.50% Discount Rate Increment would display results for discount rates of 9.00%, 9.50%, 10.00%, 10.50% and 11.00% on the Valuation Matrix.
Terminal Capitalization Rate ("DCF" and "Specified Price" valuations only) (also known as the Resale, Reversion or Residual Cap Rate) is the capitalization rate that is used to estimate the resale value (or sale price) of the property at the end of the Valuation Term. The sale price is calculated by dividing net operating income for the Reversion Cap Year (see below) by the Terminal Capitalization Rate.
Capitalization Rate Increment (all valuation types) defines the percentage increment that will be added to/subtracted from the Going-In Capitalization Rate ("Direct Cap" value) or Terminal Capitalization Rate ("DCF" or "Specified Price" value) for purposes of the Valuation Matrix on the Valuation Report. Two increments above and two increments below the applicable cap rate will be displayed on the matrix in accordance with this increment.
For example, a 9.00% Terminal Cap Rate with a 0.50% Terminal Cap Rate Increment would display results for terminal cap rates of 8.00%, 8.50%, 9.00%, 9.50% and 10.00% on the Valuation Matrix.
Cost of Sales % (all valuation types) defines the percentage by which the (i) direct cap value ("Direct Cap" value); or (ii) sale price of the property at the end of the Valuation Term ("DCF" or "Specified Price" value) will be reduced to reflect costs of disposition (i.e., broker fees, closing costs, etc.)
IRR/NPV Discounting ("DCF" and "Specified Price" valuations only) determines the calculation method to be used in the calculation of the Property Value (for "DCF" valuations) or IRR (for "Specified Price" valuations). Selections include:
- Annual (default): Annual property cash flows for the Valuation Term are discounted using an annual Discount Rate.
- Monthly: Monthly property cash flows for the Valuation Term are discounted using a monthly Discount Rate.
Note: Monthly discounting will typically generate a higher property value ("DCF" valuation) or IRR ("Specified Price" valuation) as cash flows are assumed to be received throughout each year rather than at the end of each year.
Reversion Cap Year ("DCF" and "Specified Price" valuations only) defines the net operating income to be capitalized in the determination of the resale value (or sale price) at the end of the Valuation Term. Selections include:
- Sale Year + 1 (default): Net operating income for the year immediately following the Valuation Term is divided by the Terminal Capitalization Rate to determine the sale price.
Helpful Hint: “Sale Year + 1” is the default because when a property is sold, the price paid by the next investor is based upon an assessment of income for his/her expected period of ownership. Therefore, for the next investor, or potential buyer, the net operating income for his/her first year of ownership will be the year after we sell the property. This will be the first year of his/her investment.
- Sale Year: Net operating income for the final year of the Valuation Term is divided by the Terminal Capitalization Rate to determine the sale price.
Helpful Hint: “Sale Year” should only be used if the net operating income for “Sale Year + 1” does not reflect stabilized occupancy and (i) you don’t want to use the “Stabilize Sale Vacancy Loss” option (see below) in the Valuation Settings; or (ii) you don’t want to change your Valuation Term such that “Sale Year + 1” will reflect a stabilized net operating income.
Capital Items Adjustment (all valuation types) provides an option to reduce the direct cap value or the reversion sale price by the aggregate of tenant improvements, leasing commissions and building capital expenses for the year subsequent to the valuation date or the assumed date of sale.
- No (default): No adjustment is made to the direct cap value or reversion sale price.
- Yes: An adjustment is made to reduce the direct cap value or the reversion sale price by the aggregate of tenant improvements, leasing commissions and building capital expenses for the year subsequent to the date of value/assumed sale.
Note: If "Yes" is selected, the reduction is always based upon capital items for the year subsequent to the date of value/assumed sale, regardless of whether the Revision Cap Year selection is "Sales Year" or "Sales Year + 1."
$ Adjustment Amount (all valuation types) provides the user with the opportunity to adjust the calculated direct cap value or the reversion sale price upward or downward in an amount specified by the user (for example, if a parcel of land is to be valued or sold as part of the valuation of a income producing property, the value of the land parcel as entered by the user can be added to the direct cap value or the reversion sale price of the entire property).
Valuation Amt is a non-editable field that displays the last calculated value for each Valuation Scenario.
Valuation Per Area is a non-editable field that displays the last calculated value per area for each Valuation Scenario. The denominator for this calculation is *Total Area as entered on the Area Measures screen.
Area Measures
Ctrl + Alt displays the numeric keyboard shortcut.
Accessible from both the Property and Hospitality sections, the Area Measures tab is used to:
- Define system default area measures (such as *TotalArea - Total Property Area and *TotalRooms - Total Rooms).
- Create named space measurements for Line Item multipliers where the line item is entered as Amt/Area (e.g., occupied area measures used to create variable expenses).
Area Measure named items are referenced via combo box drop-down menus in the following areas of the app (displays the Code):
- Line Items section > Input Type: Amt/Area > Area Measure field drop-down menus
- Line Items section > Input Type: Detailed Per Area > Area Measure field drop-down menus
- Departmental section > Input Type: Amt/Area > Area Measure field drop-down menus
- Departmental section > Input Type: Detailed Per Area > Area Measure field drop-down menus
- Property section > Area Measure tab > Input Type: Percent > Area Measure column drop-down menu
Area Measure Input Types
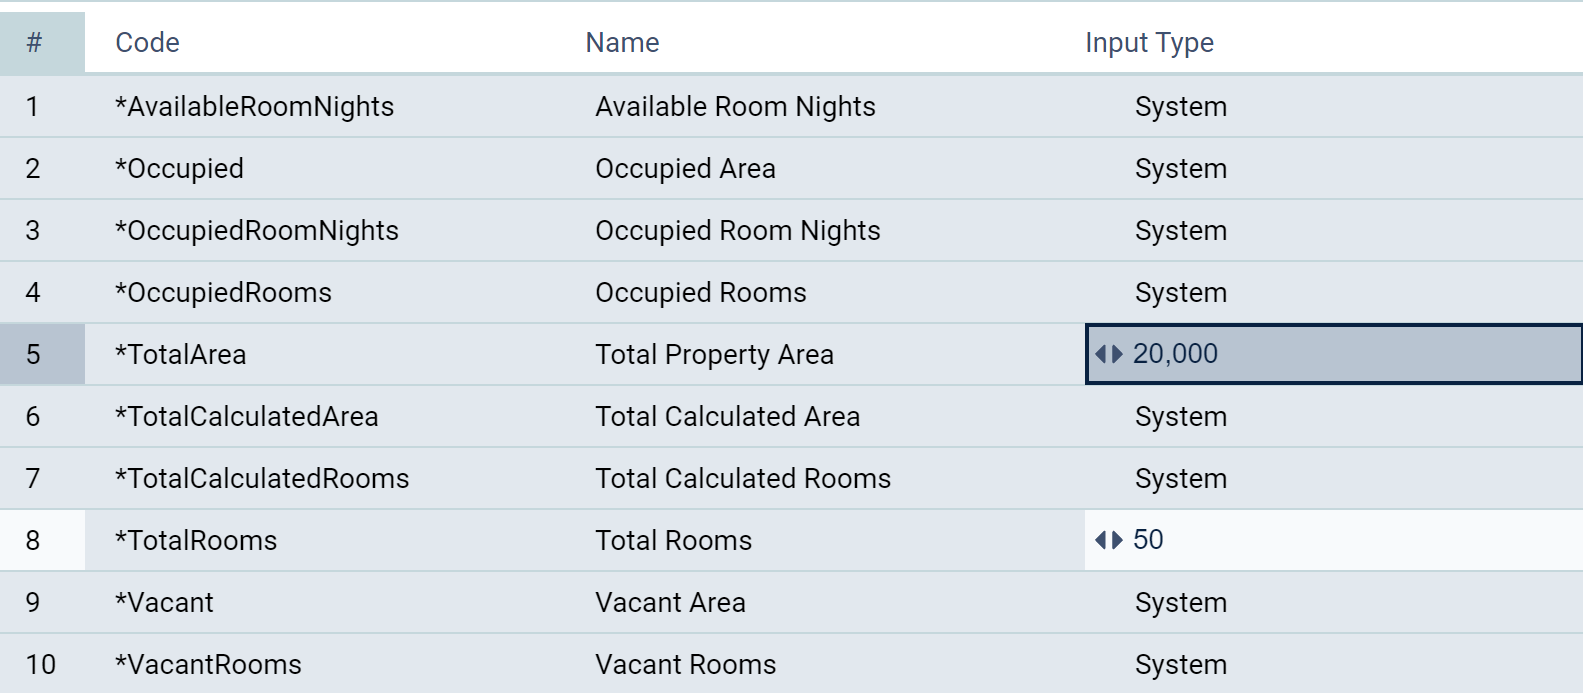
An asterisk prefix (*) indicates that the item is system defined and grayed-out areas indicate the area measure is immutable (i.e., non-editable system defined).
System
*AvailableRoomNights - Available Room Nights reflectss the number of rooms available for occupancy by guests for a specified period of time (monthly, quarterly or annually) and is calculated as the total number of days in such period (month, quarter or year) multiplied by the total number of rooms. Non-editable system defined (i.e., no user entry).
*Occupied - Occupied Area reflects occupied square footage for the entire property calculated as the total number of occupied rooms multiplied by the area per occupied room. Non-editable system defined (i.e., no user entry).
*OccupiedRoomNights - Occupied Room Nights reflects the number of rooms occupied by guests for a specified period of time (monthly, quarterly or annually) and is calculated as the Available Room Nights in such period (monthly, quarterly or annually) multiplied by the occupancy percentage for that period. If occupancy is entered on a 'Detailed Monthly' basis, then Occupied Room Nights will be calculated monthly and aggregated to arrive at quarterly and annual results. Non-editable system defined (i.e., no user entry).
*OccupiedRooms - Occupied Rooms reflects occupied rooms for the entire property and is calculated as Total Rooms multiplied by the occupancy percentage. If occupancy is entered on a 'Detailed Monthly' basis, Occupied Rooms for a quarter or year reflects the average number of occupied rooms for such period. Non-editable system defined (i.e., no user entry).
*TotalArea - Total Property Area is used to enter the total area of the property (i.e., total Net Rentable Area or Gross Leasable Area) and is typically entered using an Input Type of either Basic (property size remains static for the entire analysis term) or Detailed (property size changes during the analysis term, likely due to re-measurement or new construction).
*TotalCalculatedArea - Total Calculated Area is the sum of the square footage for all rooms entered on the Rooms screen. Non-editable system defined (i.e., no user entry).
*TotalCalculatedRooms - Total Calculated Rooms is the sum of all rooms entered on the Rooms screen. Non-editable system defined (i.e., no user entry).
*TotalRooms - Total Rooms is used to enter the total number of rooms for the property and is typically entered using an Input Type of either Basic (number of total rooms remains static for the entire analysis term) or Detailed (number or total rooms changes during the analysis term, likely due to reconfiguration of existing rooms and/or new construction).
*Vacant - Vacant Area reflects vacant square footage for the entire property and is calculated as Total Area less Occupied Area. Non-editable system defined (i.e., no user entry).
*VacantRooms - Vacant Rooms reflects vacant rooms for the entire property and is calculated as Total Rooms less Occupied Rooms. Non-editable system defined (i.e., no user entry).
Hospitality - System Area Measures
Info: Read about #, Code and Name throughout the app
Press the Enter key to input data using one of the following Input Types:
Basic Area Measure
Basic Area Measures are used when the area measure as entered in the Amt field stays constant for the entire analysis period.
Detailed Area Measure
Detailed Area Measures are used for area measures that change over time during the analysis period.
Date the area measures commences. Enter absolute (A - MM/YYYY) or relative (R - #) dates. Relative dates are relative to the Analysis Begin date.
Amt is the area measure (i.e., square footage or rooms) as of the corresponding date.
![]() adds a row beneath the current row,
adds a row beneath the current row, ![]() deletes the current row.
deletes the current row.
Detailed Area Measure
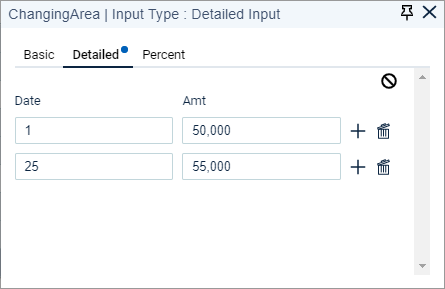
Helpful Hint: Detailed area measures are typically used when (a) a property is re-measured during the analysis period or (b) additional area is added to the property as a result of construction/redevelopment of the property during the analysis period.
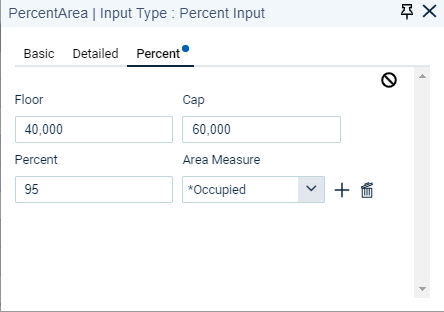
Percent Area Measures
Percent Area Measures are used when an area measure is a percentage of one or more existing area measures and may be constrained by a floor or cap.
Floor (not required) is the minimum area measure value (i.e., the calculated value cannot be less than this amount).
Cap (not required) is the maximum area measure value (i.e., the calculated value cannot be greater than this amount).
Percent is a percentage value (70% is entered as "70", not "0.70").
Area Measure is a drop-down menu of all other Area Measures.
![]() adds a row beneath the current row,
adds a row beneath the current row, ![]() deletes the current row.
deletes the current row.
Percent Area Measure
Defaults
Ctrl + Alt displays the numeric keyboard shortcut.
The Defaults tab is where defaults are set for the current property that will automatically populate the relevant fields as records are created. Defaults are used to streamline data input by auto-populating fields with the most commonly used selections.
For Hospitality property types, no entries are made on the Defaults tab. The only default is 'Default ADR Inflation', which is entered on the Property Settings screen.
Snapshots
Ctrl + Alt displays the numeric keyboard shortcut.
The Property section Snapshots tab is where a user can:
- Upload a property snapshot
- Create a property snapshot (snapshot for a single property)
- View previously created property snapshots and download a snapshot file to the user's computer.
- Share a property snapshot file with a third party organization that is also an active user of rDCF.
Snapshots Tab Tools Menu
Upload Snapshot 
Previously created Property Snapshots, either internally or received from third parties, may be uploaded so the property data contained therein may be updated and/or reported on within your organization's instance of rDCF.
- Create a new folder or select an existing folder where the property contained within the property snapshot is to be uploaded. Make sure that this folder is the active folder (a newly created folder will be the active folder by default. An existing folder can be activated by clicking on the folder name in the left side panel of the Folder Explorer tab, and then double-clicking on any property within the right side panel). A folder is active when it appears in the Header Menu.
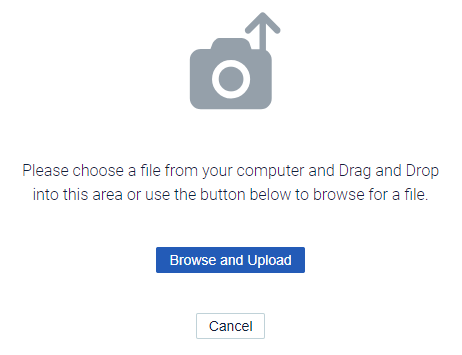
- Click ; the "Please choose a file from your computer and Drag and Drop into this area or use the button to browse for a file" window appears.
- Upload the property snapshot by either (i) dragging and dropping the appropriate .json file from your computer network onto the "Upload File" screen or (ii) clicking the "Browse and Upload" button, selecting the .json file to be uploaded from your computer network, and clicking the "Open" button.
The property within the snapshot will be uploaded to the active folder and you will receive an on-screen message when the upload has completed successfully.
Warning: If the active folder into which you are uploading the snapshot contains a property with the same Code as the snapshot, the existing property in the active folder will be overwritten by the snapshot. Prior to executing the upload, you will receive a message that you are going to overwrite the file, at which time you can elect to either continue with or cancel the upload.
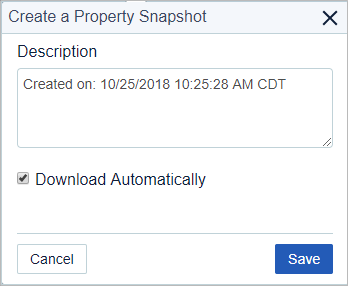
Create a Property Snapshot 
A Property Snapshot will generate a file with the extension ".json" containing data for the active property that may be used to (i) exchange property data with other rDCF users or (ii) save your property data remotely.
- Click
 ; the "Create a Property Snapshot" window opens.
 - Add a Description. The Description defaults to the current date and time. This can be overridden with a custom user-defined description.
- Check the Download Automatically check box if you would like a copy of the snapshot to be downloaded to the "Downloads" folder (or other location if set) on your computer. If this box is not checked, the snapshot will appear on the Snapshots tab but will not be downloaded.
- Click Save to trigger the creation.
Once created, Property Snapshots will appear within the grid on the Snapshots tab in the Property section.
Snapshot Tab Fields
Description is an editable field with a 50 character maximum and initially reflects the description assigned when the Property Snapshot was created.
Type is uneditable and describes how the Property Snapshot was created (defaults to "Manual").
Create Date is the date and time the snapshot was generated.
Download ( ) contains a link to download and save the file locally. The downloaded file will have the following naming convention: "Property Snapshot_[Property Name].[Creation Date/Time].json".
Share allows previously created Property Snapshots to be shared with third parties by electronically transmitting the snapshot to one or more third parties simultaneously.
To share a Property Snapshot:
- Click
 (Share icon); a message will appear stating "Generating link to snapshot...", and a "Shared Snapshot" dialog box will then appear containing the path for the snapshot link (path will also be copied to the clipboard on your computer).
 - Open your email system and create a new email:
- Address the email to any recipient that you would like to receive the path for the snapshot link.
- Add an appropriate description in the Subject line, if desired (i.e., rDCF snapshot for "ABC Property").
- Paste the path for the snapshot link into the body of the email.
- Send the email.
Restoring a Shared Snapshot
Upon receipt of the email containing the path for the snapshot link, the third party recipient can elect to restore the shared snapshot as follows:
- Click the link containing the path for the snapshot in the body of the email; rDCF will open (user will need to login), the snapshot will be validated and a dialogue box entitled "Restore Information" will appear with details of the number of properties to be added and/or overwritten (properties will be overwritten if they are located in the same folder and have the same code).
- Click the "Restore" button to restore the snapshot; the system will automatically perform the restore function and a "Snapshot Success" dialogue box will appear when a successful restore has been completed. The snapshot will be restored into a folder and sub folder path entitled "<*Inbox><UserName>" and is now available for additional analysis by the third party recipient.
Helpful Hint: It is recommended that the properties in a successfully restored snapshot be moved or copied out of the *Inbox folder into a more descriptive folder prior to performing additional analysis.
Snapshot Tab Row Tools Menu

Delete
Deletes the snapshot.
Restore
Previously created Property Snapshots may be restored within the currently active folder.
To restore a Property Snapshot:
- Click
 (Row Tools icon) for the snapshot to be restored.
 - Click
 (Restore icon); a dialogue box entitled "Restore Information" will appear with details of the number of properties to be added and/or overwritten (properties will be overwritten if they are located in the same folder and have the same code).
 - Click the "Restore" button to restore the snapshot; the system will automatically perform the restore function and a "Snapshot Success" dialogue box will appear when a successful restore has been completed. The snapshot will be restored within the currently active folder.
Import/Export
Ctrl + Alt displays the numeric keyboard shortcut.
The Property section Import/Export tab is where a user can:
- Export, update, and re-import, i.e., add or edit records for a single property using Excel templates
- Export input data and/or calculated results using the BI ("Business Intelligence") Data Export
Tip: To import or export for multiple properties simultaneously rather than for a single property, see the Import/Export tab located in the Folder section.
Excel Import Use Cases
Sensitivity Analysis
- Market (e.g., ADR, inflation, etc.)
- Occupancy
- Line Items (e.g., mgmt fee % of EGR, capital reserve rate/SF)
Creation/Standardization
- Create a property from scratch
rDCF Export
rDCF Export is used to export existing property, inflation, line item and/or rooms data into an Excel file (.xls or .xlsx files only) for record editing and/or addition (typically used for sensitivity analysis). Since this export is performed within the Property section, the exported Excel file includes data for only the currently active property.
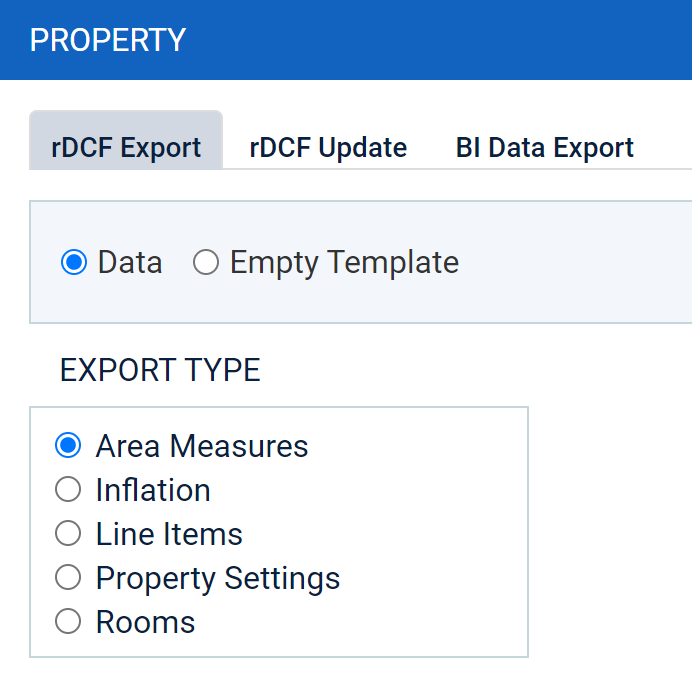
- To export data, select the Data radio button. To export an empty template, select the Empty Template radio button.
- Under "EXPORT TYPE," select the data or template. Note: Multiple exports cannot be performed simultaneously (i.e., only one template may be exported at a time). Note: Departmental Line Items are included with the Line Items export.
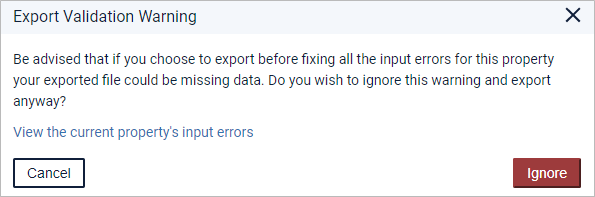
- Click the Export button. If exporting "Data" and the property contains input errors, a status window entitled, "Export Validation Warning," appears. Click Ignore to export or View the current property's input errors to open the "Please review the following;" window which displays all property input errors. If no input errors exist, the file will open in Excel.
- Make edits and/or additions as desired and re-save the Excel file, which is now ready for upload (see "rDCF Update" below).
 `
`
rDCF Update
rDCF Update is used to upload Excel files (.xls or .xlsx files only) previously created via the "rDCF Export" tab.
rDCF Update is typically used for sensitivity analysis whereby an Excel file is created via the Export tab, data is edited within the Excel file and then re-imported into rDCF via the Upload tab. Uploads may be done via browsing for or dragging and dropping the relevant Excel file.
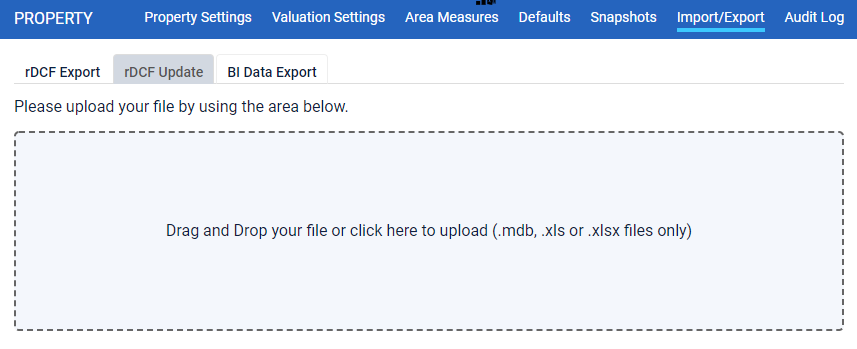
- Either export data to be edited for the currently active property and edit as desired or download an Excel template and add desired data for a single property (see "rDCF Export" above). Save the Excel file with the additions/edits.
- Drag and drop file to upload or left mouse click within the upload area to browse and select from locally saved files. A status window entitled, "Import Information" appears, displaying the number of rows being inserted or updated and the number of rows that are unchanged.
- Click Continue Import to import or Cancel if the status window displays unexpected results.
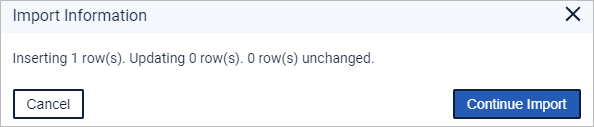
If the file imported without errors, the following message will appear:

BI Data Export
BI (“Business Intelligence”) Data Export is used to export existing property input data and/or calculated results into a .csv file (clicking on a .csv file will open that file in Excel) for populating a data warehouse, filtering/auditing data and calculated results or writing custom reports. When this export is performed within the Property section, the exported .csv file includes data or calculated results for only the currently active property.
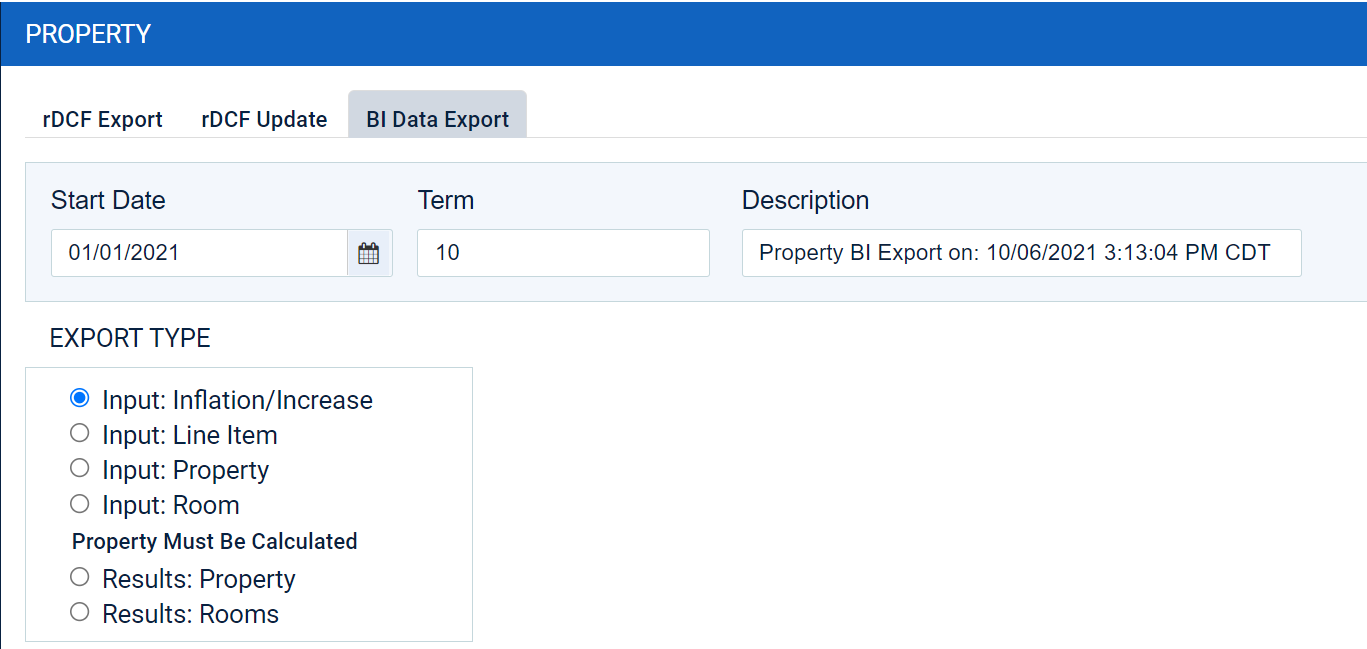
To perform an export:
- Enter the Start Date (defaults to Report Begin for the property) and Term (defaults to the lesser of the number of years entered in the Term field for the property or 10 years).
- The Start Date may not be prior to the Analysis Begin Date (as entered on the Property Settings tab) or subsequent to the analysis Term (as entered on the Property Settings tab) less one year.
- The Term must be at least one year and may not exceed the maximum period of time for which data is available. If a Term is entered that exceeds the maximum, the Term will default to the maximum years for which data is available.
- Note: Start Date and Term apply only to calculated result BI data exports.
- Add a Description. The Description defaults to “Property BI Export on: [current date and time]”. This can be overwritten with a custom user-defined description.
- Under Export Type, select the BI property input data or calculated results to be exported. Only one BI Data Export Type may be selected (i.e., multiple exports cannot be performed simultaneously).
- Click the Export button. Upon completion, the .csv file will be available for download from the “BI Data Exports” section of the Dashboard.
The following Export Types are available for download for the currently active property:
Note: All Export Types provide the same data regarding folder location of the property, the Property Name and Code, and the Property Type.
Input: Inflation/Increase - Input data for all Inflation rates
Input: Line Item - Input data for all line items, including Departmental (Expense, Building Capital)
Input: Property - Input data for property settings and valuation settings
Input: Room - Input data for all unit records entered in the Rooms section (Rooms/Area, Occupancy, ADR).
Results: Property - Calculated results presented as a monthly time series for (i) every line that appears on the property cash flow report, including system line items (preceded by an “*” in the Item Type column on the export); and (ii) Occupied and Total Calculated Area Measures and Rooms.
Results: Rooms - Calculated results presented as a monthly time series for each room type for (i) Occupied and Vacant Area and Rooms; (ii) statistics such as ADR, Available Room Nights, Occupied Room Nights, RevPAR and Total Rooms; (iii) Potential, Occupied and Vacant Room Revenue.
Warning: A property must be calculated in order to generate BI data exports for the following Export Types:
- Results: Property
- Results: Rooms
Audit Log
Ctrl + Alt displays the numeric keyboard shortcut.
The Audit Log tab is where a record is kept of all changes that are made to a property's data (adds, edits, deletes). The Audit Log is useful to determine:
- Who made the changes
- What operations were performed (i.e., calculation)/changes were made
- When the changes were made
For each change that is made, the Audit Log adds a record (i.e., a row) providing the details of the change, including the following information:
Location: Identifies the section where the change was made.
Code: Identifies the record that was changed.
User: Identifies the user that made the change.
Change: Provides the details of the operation that was performed/change that was made. Click on the caret arrow (▶) to expand the record to identify the specific changes. Prior values are listed in red text whereas the new value is listed in green.
Date: Identifies the date and time the change was made.
Boxes beneath the column headers allow the user to filter the data in the Audit Log. For all columns except Date, enter the text you wish to filter by, and the number of rows displayed will decrease based upon your filter criteria. Multi-column filtering is available (for instance, first filter by Location and then by User). To filter by Date, enter the date range that you wish to filter by, using the Date Min and Date Max fields.
To export the Audit Log to review entries, click the ![]() button located to the right of the column headers.
button located to the right of the column headers.
Comments
0 comments
Article is closed for comments.