
Anything related to the physical existence of the Suite itself is handled here, not on the Rent Roll Tab. All Suite information is contained in pane 1 and tenant information in pane 2. Although Suites are imported from the source accounting system, they can be modified by a User.
Article contents:
Columns
Suite - Name/title
Floor - Floor number
Suite Type - List of application defaults
Start & End - The dates the suite starts and ends
Rentable Area - Actual Suite square footage
Usable Area
Renewal Type - Only available and applicable in budgets of Type = LTF. Can be edited on the Rent Roll tab in the Renewal Type column. Clicking the link, e.g. Speculative, opens the "Suite MLA Edit" pop-up window.
- Speculative (renew) - Default. When the base lease ends, auto-generate or create weighted average speculative renewals (blended rates). If the Suite has an End date, the application will not allow auto-generated renewals. All Tenant/Suites that do not have any re-demising but whose leases are ending will default to Renewal Type = Speculative. Applies weighted average renewal based on Market Lease Assumptions.
- Renew - The first time a lease comes up to a speculative renewal, assume that the tenant is going to stay for that cycle only; 1st roll-over without downtime. No downtime, grab the renewal rates. Assumes current tenant renews, no downtime, then applies MLA renewal assumptions.
- Vacate - Assume for the first auto-generated rollover that the tenant is going to vacate; new rate plus full downtime. Assumes current tenant vacates, uses full downtime period in MLA, then applies MLA new lease assumptions
- None - Nothing happens to the suite. Similar to being 'Reabsorbed' in Argus. Commonly, re-demised Suites. Assumes no lease-up after current tenant expires. Space goes vacant.
Market Lease - Budget & Building level Market Leases
Delete
Alert: Suites cannot be deleted if currently in use (i.e., an assumption is currently attached to the suite). Delete assumption from Rent Roll tab and then the suite from the Suite section.
View Active Suites
Filters the list of Suites in a building to only those that are currently leased.
Click "View Active Suites" on the toolbar. All currently leased suites in the building will be displayed.
To view all suites again, click "View All Suites."
Reconfigure Suites
Steps to end, create a new, and attach a new assumption to a reconfigured, re-demised, re-measured Suite:
- End the Suite. Enter a date in the End field; typically the same day that the attached lease ends.
- Add the new, re-measured, reconfigured Suite with the new Rentable Area and Leasable Area. The Start date should be the day after the old Suite's End date or further out.
- In the Rent Roll, add the new assumption to the new Suite, not the old/ended (Suite).
Alert: The Suites section is for the physical suites themselves. Rentable Area and Usable Area in the Suites section are the actual suite SF. The Area column on the Rent Roll can be adjusted on a new assumption if the lease terms call for a different SF. The only time to end a suite and create a new suite is if it was remeasured or reconfigured.
Market Wizard
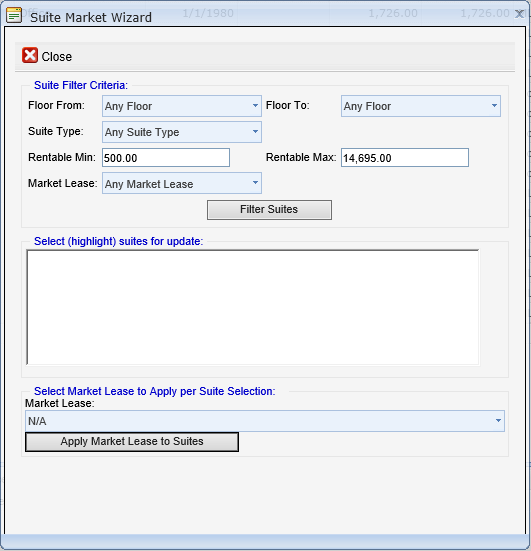
The Market Wizard assigns Market Lease assumptions to any Suite in a building based on the size, type, and floor location for the purpose of comparison reports, Argus Export, and/or Long Term Forecasting.
- Click the "Market Wizard" button; the "Suite Market Wizard" pop-up window appears. The Suites to apply assumptions to can be filtered by floor, type, rentable area and market lease.
- In the Suite Filter Criteria: section, select the floor(s) in the Floor From: and Floor To: fields and type in the Suite Type: field.
- Provide the minimum and maximum rentable area in the Rentable Min: and Rentable Max: fields.
- Select the type of Market Lease you wish to apply to the Suites in the Market Lease: field.
- Click "Filter Suites." A list of all building suites within the selected parameters appears in the Select (highlight) suites for update: section.
- Select the Suites that the Market Lease will be applied to by clicking on the Suites in the Select (highlight) suites for update: section.
- Select the Market Lease to apply to the filtered Suites in the Market Lease: field of the Select Market Lease to Apply per Suite Selection: section.
- Click "Apply Market Lease to Suites;" a pop-window appears informing that the selected Market Lease has been applied.
- Click "OK."
Split
Alert: Do not re-demise Suites that are currently occupied. If necessary on the Rent Roll, terminate a tenant early before splitting or combining Suite(s). The system will not allow a Suite to double-up occupancy.
- Select the suite in the tree view pane or the right-hand pane.
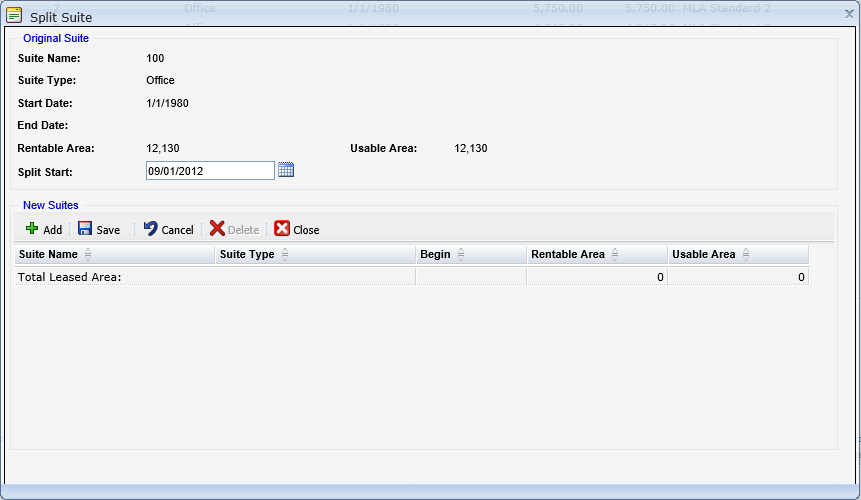
- Click "Split Suite" on the toolbar; the "Split Suite" pop-window appears containing the specifications for the original suite and allows a user to add an additional suite.
- In the Original Suite section, enter the date the original suite will be split in the Split Start: field
- Click "Add" on the New Suites toolbar.
- Enter the Suite Name, Suite Type, the date the lease will Begin, Rentable Area and Usable Area.
- Click "OK" if you intended to alter the square footage of the building or "Cancel" if you modified GLA in error and wish to undo your changes.
- Click Save on the toolbar. A pop-up window will appear to confirm the new Suite(s) to be added.
- Click "OK." The new suite(s) appear in the Building Tab Suites section and Rent Roll tab grid.
Info: When a Suite is split, the suite begin date for the newly created Suite(s) will automatically be set to the lease end date, +1 day. The combined rentable area of the split Suites does not have to equal the rentable area of the original Suite. As a precaution, a warning will appear if leased area has been created or lost as a result of the split.
Combine
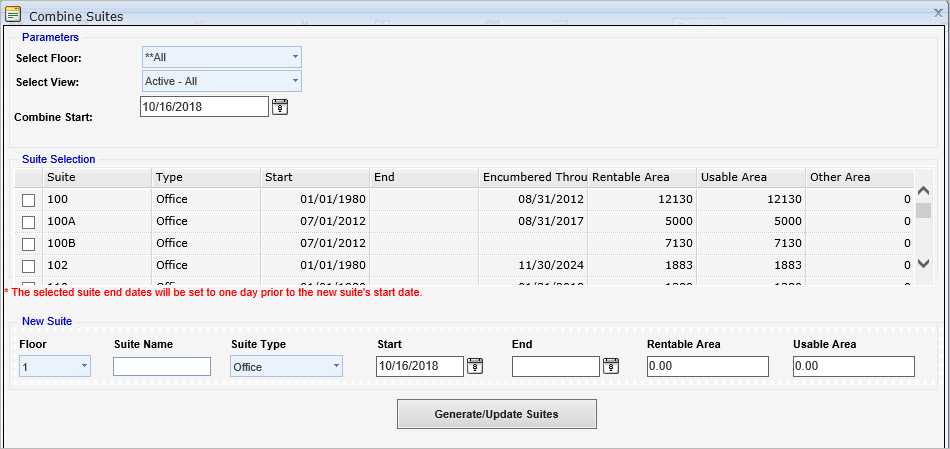
- Click "Combine Suites" on the toolbar; the "Combine Suites" window appears allowing you to choose the suites to combine and provide specifications for the new combined suite. In the Parameters section:
- Select Floor: Drop-down list of all Floors in the building. Filters the list in the Suite Selection section.
- Select View: View all (Active - All) or only those that are currently not leased (Active - Unencumbered)
- Combine Start: Enter the date the new combined suite starts.
- Suite Selection - Select the to suites to combine using the check boxes.
- New Suite - Select Floor number, enter Suite Name, Suite Type, Start & End dates, Rentable Area and Usable Area. Do not enter an End date for the combined suite. Suites are assumed to remain leasable to perpetuity.
- Click "Generate/Update Suites."
Info: The application will automatically set the End date of the Suites to be combined to be one day prior to the combined suite's Start date. The application will automatically calculate the Area for the combined suites based on the areas of the original suites.
Comments
0 comments
Article is closed for comments.