
In this article:
- Overview
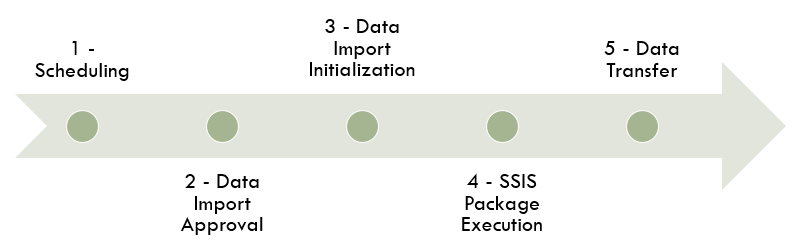
- Data Push Workflow
- Installation
- Integration Schedule
- Troubleshooting
- Adding Buildings via RISE
- Adding New Building to a Budget
Overview
RISE: "rSquared Integration Services Engine"
- Provides a secure data import from all major accounting systems into the rSquared Cloud Suite for web-based synchronization
- Bi-directional integration with core accounting system
- On-demand or scheduled
Reverse RISE – Scheduled data drop back to client server
- Leasing Detail
- Occupancy and Calculation Metric
- Market information
- GL Financials
rSquared Adds:
- Business Units
- Leases
- Charges (referenced) - Charge Codes that already exist and have proper account mapping.
- GL Accounts - Account Type and Display is unassigned and a user must update them.
- Recovery Definitions
- Buildings
- Actuals
- Capital - Pipeline only
- New accounts
Data Push Workflow
Installation
Client Technical Requirements for RISE Installation - NEEDS UPDATING
- Windows installed on Server
- MS SQL 2008 R2 Standard (not express)
- Microsoft Visual Studio 2008 with Business Intelligence tools
- https (port 443)
RISE system Space Requirements
The RISE database is small but some clients pull over as much as 5GB of data. The RISE install requires 10GB of space but clients will then need to add the data size that they want.
Actual hard disk space requirements depend on your system configuration and the features that you decide to install.The following table provides disk space requirements for SQL Server 2008 R2 components:
| Feature | Disk space requirement | |
| Database Engine and data files, Replication, and Full-Text Search | 711 MB | |
| Analysis Services and data files | 345 MB | |
| Reporting Services and Report Manager | 304 MB | |
| Integration Services | 591 MB | |
|
1823 MB |
Information required from the Client
- Version of Windows installed.
- Version of SQL Server installed (SQL Server 2008 R2 is required).
- Is data on the same server ‘RISE’ will be installed or at a linked server? If data is on a linked server, then creating a “Views” database is suggested. Views” database contains SQL database “Views” that fetch data from the linked server.
- Backup of the client (SQL Server 2008) database (sql backup).
- List of tables to be exported.
- Set up service account with all the required permissions for installing and executing “RISE”.
- Microsoft Visual Studio 2008 with Business Intelligence tools
Additional Requirements to install and run RISE:
Rise will be installed and run based on an active directory service account.
- Password should be complex and set to never expire and not be able to be changed
- Service account should have access to install services locally on host and login
- Service account needs access to the RISE database as well as the accounting system or the view that has been setup.
RISE host will need internet access using port 443
Data Execution Prevention (“DEP”) needs to be disabled.
Troubleshooting
A non-technical view point:
THIS IS WHERE RISE STOPS:
- Think of RISE as UPS/FEDEX/Postal Service: It delivers packages
- RISE only makes data available to end users in the Realogic Budget environment.
- It does not auto-import anything to Realogic or any client’s systems (data warehouse/cube/accounting system.
- It’s a scheduled service so the same thing happens each “night”.
WHAT GOES WRONG?
- Can’t deliver the package
- No file was available to deliver – there was a long running calculation set and it conflicted with the systems schedule delivery.
- There were Access Changes made to the client servers.
- SSIS package broke due to client side changes to data structure.
COMMON REASONS:
- Disk space is full on client servers.
- No file was available to deliver – was a long running calculation set and it conflicted with the systems schedule delivery.
- Access Changes to the Servers
- SSIS package breaks due to client side changes to data structure.
Integration Schedule
Read more: Client Admin Integration Schedule
Adding Buildings via RISE
Directions to add assets/buildings from RISE:
- Got to the Client Admin Portfolio section; it must have an "All Properties" or similar portfolio created.
- Go to this portfolio and look for any buildings in the Available Buildings field.
- Move buildings to the Assigned Buildings field by clicking or using the arrows.
- Save.
- Add building(s) to other relevant portfolios.
- Import into budgets (see below)................................................................................................
Adding new Buildings to a Budget
Directions to add assets/buildings to a budget:
- In the corresponding budget, go to the Budget Admin Buildings section.
- Using the Building Import Wizard, select the import parameters:
- Import Type:
- Copy
- Copy (zero-based)
- Source Budget:
- List of Actual Leasing Budgets (RISE) and regular budgets that already exist in the app.
- Move Available Buildings to the Assigned Buildings field.
- Import Type:
- Save.
Info: Client Admin Buildings
Info: Budget Admin Buildings
Comments
0 comments
Article is closed for comments.